
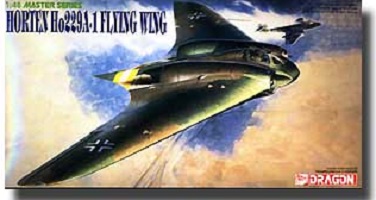
Horton Ho229A Flying Wing – Dragon
Horton Ho229 – Appeared in Dec 2007 issue of Scaled Aircraft Modeler


This model was featured in Scaled Aircraft Modelling, Dec 2007 Issue. For the article pictures, click on them to see a larger view.
Introduction
Looking at the modern B-2 stealth bomber, the first successful production flying wing serving in any air force – it is interesting to note its predecessors. These included the flying wings from Jack Northrop in the United States and Dr. Lippisch in Germany. For fans of Luft ’46 projects however, the ultimate flying wing had to be the Horton Ho 229. This aircraft was unique in that it was very close to complete production as the war ended. As US troops swept over Germany in 1945, they overran the Gotha factories which had a number of Ho 229’s on the production line.
The Horten brothers – Walter, Reimar, and Wolfram – were all avid glider enthusiasts in the 1930’s. Walter and Reimar having won several model glider competitions. All three brothers then entered the new German Luftwaffe in 1935. While Walter and Wolfram became pilots (Wolfram was killed in the Battle for France in 1940), Reimar became an instructor and built all wing gliders for other Luftwaffe officers. After participating in the Battle of Britain, Walter was transferred to Berlin’s Technical Office of the Inspection of Fighters. In 1941, with his new found influence, he was able to arrange a transfer for Reimar into a secret unit, Sonder-Kommando 3. In effect, the two brothers created a black project within the Luftwaffe to pursue building an all wing fighter without any oversight or approval from the Luftwaffe.
After seeing Dr. Lippisch’s demonstration of the Me 163 prototypes, the brothers decided to use the BMW and Junkers’ turbojet engine then under development to build their flying wing. By early 1943, two prototypes (V1 and V2) were close to completion – dependent on the delivery of BMW 003 engines. At this point, luck allowed the Horten brothers to get official sanction for their secret project. Herman Goring felt the Luftwaffe needed a 3×100 fighter/bomber, that is one that can carry 1,000 kg bomb at 1,000 km/hr and had range of 1,000 km. His offer included 500,000 RM to the first approved design. Needing no more incentives to unveil their secret project, the Hortens submitted their plans and won.
Development then picked up with official approval. In March of 1944, the V2 was nearly finished but missing its engines. Unfortunately, the BMW 003 engines were behind schedule and instead, two larger Jumo 004s had to be used instead – which required redesigning the engine housing. Thus what was a smooth wing surface now encased two large bumps to hold the new engines. By Christmas of 1944, the V2 had its first flight. Despite a crash which killed the test pilot in Feb 1945, the aircraft was ordered into production for 93 units as the Ho 229 A-1 with Gotha. These day fighters were to be armed with 2 Mk 103. In addition, prototypes for Night fighters and a 2 seat version were also ordered. In April 1945, the US army overran the Gotha factories and found the Ho 229 A-1’s in various states of completion. The sole remaining Ho229 is currently awaiting restoration at the United States National Air & Space Museum Udvar-Hazy Center where the Horton Glider prototype is on display

The Kit
If you want to build a Ho229 in 1/48th scale, your choices are limited to the Dragon model kits. There is a choice between the A model day fighter or the B model 2 seat night fighter. Both kits come with a full set of decals including stencils, a photoetch fret for the seat harness and other miscellaneous items. The main difference between the two kits besides the obvious addition of a second seat in the B model is that the A model includes both detailed interior armament and Jumo 004 Engines. To show it all off, the A model allows the service panels to be displayed opened.


The Build
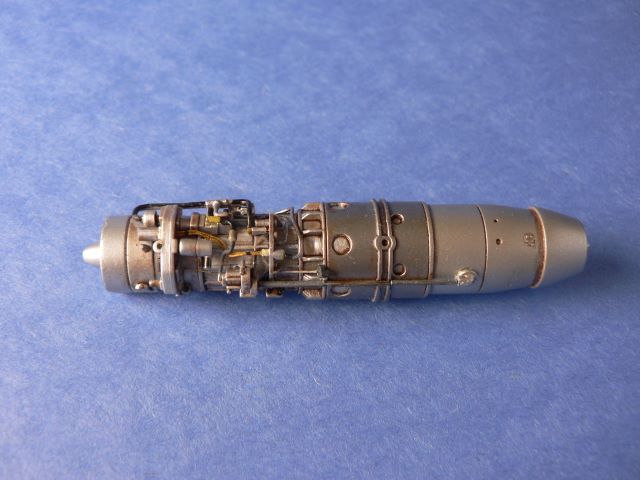
Since the great engines were one of the reasons I chose this kit, I decided to build these first instead of the usual cockpit. It’s surprising how many pictures you can find of the Jumo engines, but most of them were not close enough to help in detailing the engine. Luckily, when I visited the Udvar Hazy Museum in Washington DC, they had the engine on display and I was able to take some close up shots.


The engine was fairly easy to assemble, the only issue was with one of the rods being too short, so I replaced It with evergreen plastic rod
After priming with Tamiya gray primer, I gave it a coat of Alclad white aluminum overall and dark aluminum in the heat shield. Note however that some references show this shield to be a darker metallic gray. The great thing about Alclad is that it dries quickly. Within an hour or so I was used burnt sienna and black oil paint wash to bring out the details. You can see the difference the oil wash made between the two engines. As I was planning to only display one engine, I left the other one as is. After letting the oil wash dry overnight, I proceeded to add additional tubing with thin solder and wiring from thin copper wires salvages from an old video game controller. This is where the reference close-ups came in very handy. As with any detailing, you have to decide for yourselves when enough is enough. For myself, I have two simple rules: 1. Add details until the part has a ‘busy’ look to it and 2. Never add any details you can’t see in the finished model – my modeling time is limited as it is! You can compare the detailed engine with the undetailed one below.

Some test fitting with the engine in the bay shows that you can see through to the undercarriage. Now, on the real aircraft, this was also the case. However, you can also see the mess of tubing and wiring inside the fuselage. This area just looked too empty for me to leave it alone. Using plastic rod, I recreated the metal tube structure in this area. If you look at some reference photos, you will see that the Ho229 is really metal clad over a tube frame in the central fuselage and the wings were clad in plywood. This was done to conserve strategic material since by 1944, the Allied bombing campaign created shortages in such material. I also added a fire extinguisher made from an old capacitor and painted it red. Is that the right color? Not sure, but it added some bright color to the otherwise drab military flats.

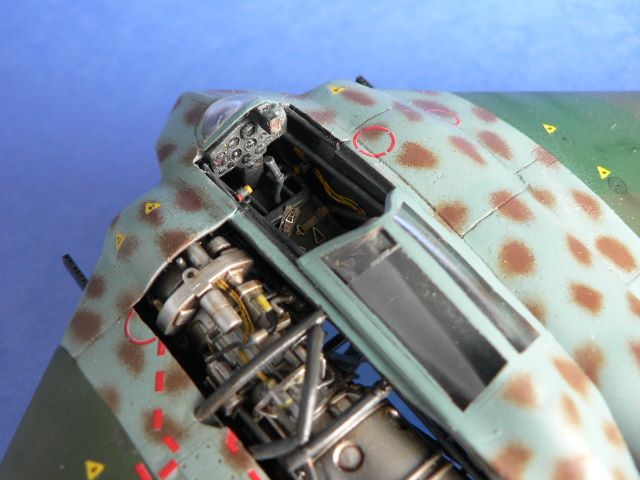
We finally get to the cockpit. The details were somewhat basic here, so I started by adding more tube support with plastic rods and wiring harness with solder. The instrument panel was painted a dark gray since black would be too dark for this scale. Some dry-brushing and color details completed the panel. Some additional wiring was added to the throttles and floor area. After everything was painted, Eduard German pre-painted PE seat belts were added. Eduard’s color PE line offers details that you can’t hope to replicate in 1/48 scale by hand. Compared to my previous method of Reheat PE buckles threaded with fabric strip, they do appear a bit flat. However, the amount of labor and eye strain spared is a trade off I’m happy to make.


Before we’re ready to fit all the major components together, I closed up the enormous cutout meant for the canopy on top of the fuselage. As in most cases where the manufacturer decides to add movable surfaces, compromises are made. In this case, the gap allowing the canopy to slide back and forth was not in the actual aircraft, but in fact, side rails were used instead. So I closed it with plastic card and used putty to completely eliminate this cutout. I used more plastic rod at this point and created more of tubing structure that you can see from the open engine access panels.


We’re now ready to close up the fuselage. The trickiest part of this operation is gluing the engines in place. The placement is somewhat vague so plenty of dry fitting were needed. Once the major components are in, you come upon the most difficult part of this kit. Just as compromises were made to accommodate a sliding canopy, huge fit problems resulted with the ability to have detachable wings and open engine access panels. The worst is the fit between the front and rear fuselage where a huge compound step needs to be eliminated. (3rd photo) Plenty of putty, filing and more putty were required. The same is true if you wished to close one of the engine panels. These were definitely meant to be displayed opened as they sit too deep into the fuselage. So out comes the filler and sanding sticks again.


Painting
The model is now ready to be painted as I’ve elected to put the canopy and landing gear on afterwards. The landing gear looks to be somewhat fragile and the large opening underneath would definitely be easier to mask without it. Now, the fun part of any Luft ’46 project is the almost complete freedom to choose your paint scheme. Not being that imaginative, I’ve decided to base mine on JG 400, as they were slated to receive the first production Ho229. At the close of 1945, this group was flying Me 163s, and I extrapolated that paint scheme onto the Ho229. Since there are no vertical surfaces, some artistic license will apply here. The main fuselage top and bottom was the usual Luftwaffe Light Blue while the wings used olive-green and light green. Brown-violet was used as mottling over the fuselage body. All the paints were Model Master Acrylics – no mixing required.
I first painted all the landing gear areas with dark gray and also used the same dark gray as preshading on the wing area. I then proceeded to mask these areas and the cockpit off with wet tissue and tape. The open engine area had the engine cover temporarily tacked on as masking. I then airbrushed the light blue onto the fuselage and under the wings. This was followed by olive green over the upper wings. The dark colors here unfortunately made my preshading a wasted effort. After masking with Tamiya tape, I painted the light green to create the splinter camo.


Then came the dreaded mottles – for me at least!. Using a light touch on my double action airbrush, I applied the mottles freehand. I had to fix up some areas with a bit of the light blue afterwards, but overall it came out not too poorly – not great, but good enough my second mottle attempt.

Weathering and Decals
I then applied my usual overcoat of undiluted Future floor polish to prepare for weathering and decaling. I prefer to use artist oil colors as a wash. Over a gloss coating, this is a most forgiving method as the oil wash can be easily wiped off with a bit of mineral spirits. I usually apply the highly thinned oil wash (black and burnt sienna) directly onto the engraved lines and let capillary action draw the wash through. After a few minutes I use a cotton swab to wipe away any excess or draw the wash with the air flow direction to create some weathering.
I then applied multiple light coats of Tamiya smoke behind the engine exhaust area and some under the cannon ejection chutes. Overall, I kept weathering to a minimum on this build.
The decals were then applied with no surprises. I did cut the large decals into smaller manageable pieces, as large pieces will always bunch up somewhere when you are not paying attention.
Final Details
I was then able to finally glue the detailed engine into its place. At this point the modeling was basically complete except for the undercarriage. This area came together with a minimum of fuss despite some poor fit and unclear directions. Next came the finished canopy, the cannon heads, and phototech antennas which completed the build.
Overall, this was a great kit to build. Just get past the poor fitting front and rear fuselage and you will have an example of this most extraordinary aircraft that almost became operational.


